I Had the Best Music Class in Middle School

I realized just now that the only person I’ve told about this is my wife.  So let’s fix that.

In 7th grade, I, naturally, had to take several classes that are called “specials” now.  These are the arts, outside of general ed curriculum, like music and art.  My music class was unlike any other, and in my 18 years working K-12, I’ve never seen it again.

7th grade, 12 years old.  I learned the history of rock’n’roll.

Our music class wasn’t a bunch of bored pre-teens sitting around singing boring songs out of tune and off-key.  We weren’t playing instruments badly.  No, we were learning about the impact and influence of early jazz and big band and swing and gospel on what would ultimately become “rock and roll.”

We listened to the Beatles’ “Revolution #9” and because it was the ’80s and record players still existed, we learned about the backwards playing.  And we actually listened to it, and examined its impact on society at the time.  I learned about Led Zeppelin, The Who, The Yardbirds, Cream, Deep Purple, and Jefferson Airplane….and their evolution into Starship, since “We Built This City” was the new hit song on the radio at the time anyway.

It was not just a history of rock and roll, but a history of the ’60s and ’70s at the same time.  If we weren’t listening to records and tapes, we were watching documentaries about Woodstock (sanitized and censored to be appropriate for 12-year-olds, of course).

At the end of class, our teacher would let us play a cassette of our choice.  He encouraged each of us to bring something in to share with the class.  If nobody did, then he would play his own mix-tape of classic rock.  I, of course, would bring in my “Dare to Be Stupid” tape, and not only would my teacher laugh at Al’s parodies but he would dive deep into Al’s musicianship and songwriting skills.

He literally dissected Weird Al Yankovic.

It was the best music class I’d ever had.  And it’s something I’ve never seen since.

When Field Calculations Identify Typos in Sources

The project: aggregate Fountas & Pinnell performance results for the past three school years.

The challenge: put together the assessments from 6 grade levels over 3 years in 2 test periods per year into one table (so a total of 36 separate sources into one).

Result: something isn’t right.

I created the source table in Illuminate and downloaded it to prepare to use JasperSoft Studio Pro to create a BI analysis of performance over time.  That’s when I noticed something weird:

At the same time, I loaded the file into Excel to start a pivot chart, and saw the same thing:

Where is the 2016 academic year for 1st grade?  And what the hell is that 201 doing there?  I clearly had bad data in the source file.

So I went back to Illuminate to look at the custom report that created that data file.  I sorted by academic year to see where that 201 was coming from.

The reason this jumped out at me is because of the use of calculations and translations in the Advanced menu of the report builder.  I needed to somehow grab the grade level of the student and the academic year in order to get some kind of separation in my BI report, but that information isn’t stored within the assessment itself because of how Illuminate manages student visibility to users, depending on permissions and filters.

To get around that, I created the Grade column as a calculation, using the formula SUBSTRING(G FROM 19 FOR 1), which means “take Column G (the one titled Assessment Grade/Administration) and starting at position 19, grab 1 character.”  Because all of the assessments are named according to the same convention, that position would be the grade value (K, 1, 2, etc.).

Then, I created a second calculation column for Academic Year.  That formula was SUBSTRING (G FROM 1 FOR 4), so taking the first four characters of that same column, resulting in values of 2014, 2015, and 2016.

I wasn’t done yet, because those don’t really represent the academic year the way we need it to.  Those values are the start of the school year, when I want the end.  In comes the translation feature in the advanced menu.

I added translations for all three values, making 2014 = 2015, 2015 = 2016, and 2016 = 2017 so that at the very least, when I download the data, it’ll look right and I can do additional manipulation after that.

So when I saw the blank in Grade and 201 in Academic Year, there was something goofy going on with my calculated fields and translation.

Then I looked to the right and saw that they all shared the same assessment source.  2015-16 F&P Grade 1 Spring.  I stared at it for a moment.  Every other assessment grabbed those substring values correctly except for this one.

Which meant that, since the substring calculation for academic year was supposed to grab the first four characters, and the grade field grab the 19th character, but I was only getting the first three of the year and a blank for grade…..

Was there a space in the name of this particular assessment that I can’t see right off the bat?

I went into that assessment and opened up the information window for it, and lo and behold….

The calculations and translations were working correctly.  The calculation for the year was grabbing the first four characters, as designed.  The problem is that the source had an extra character where it shouldn’t have been.  Which caused the 19th character to be the space before the 1.

And since I didn’t build a translation rule for values of ” 201,” it didn’t translate anything for me.

Take out the space, go back to my custom report and…

Perfect.

So even though we don’t want bad data, bad data can still tell a story.


Cliches to Make Your IT Life Better

Two simple cliches that have improved my life over the years:

There’s gotta be an easier way.  This means that no matter what problem you’re trying to solve, you’ll probably find yourself deep in the weeds and overgrowth at some point.  That’s when you have to stop and say “there’s gotta be an easier way to do this,” because there is. You just have to find it, and finding it means reevaluating what you’re doing and what you’ve done.  What you’ve been doing is clearly not the easy way if you’re at this point.  Which leads to the next one.

Make the computer do the work.  That’s what they’re built for!  Automating repetitive tasks, which they’ll do much faster and more accurately anyway.  As OSes and software grow and advance, more automation is built in.  Learn them and take advantage of them.  If you’re doing things manually all the time, you’re doing it wrong.

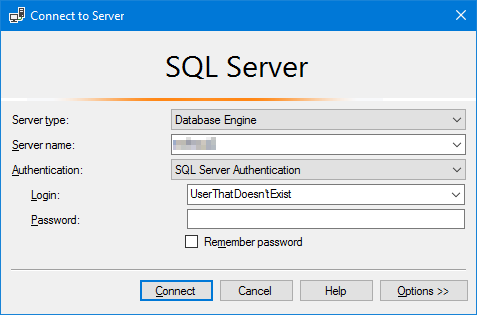
Clearing a Remembered Login from SQL Server Management Studio

Dating back to the olden days of earlier versions of SSMS, it likes to remember the login name of the last new user, even if that user has since been deleted.  While it’s not a functional deal-breaker in using SSMS, it’s just plain ol’ annoying.

The information is stored in this file (naturally, I’m using Windows 10 here):

%AppData%\Microsoft\SQL Server Management Studio\[version]\SqlStudio.bin

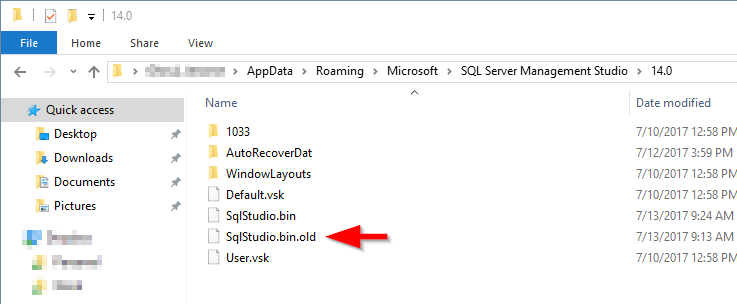
I renamed the existing SqlStudio.bin to SqlStudio.bin.old and the next time I launched SSMS, it recreated a new SqlStudio.bin:

The only downside, of course, is that it blows out everything — saved server connections and every other login detail.  But that shouldn’t be a big deal because if you have many servers and many different logins, you should have all of that stored safely in a secure repository elsewhere, right?

I mean, nobody would be silly enough to use the same simple password for “sa” for every SQL server they manage, right?  Right?

More UEFI Fun: Apply Operating System Fails Again and Again

Y’know, I’m just going to stop mentioning 0x80004005 because we all know it’s the most common thing that happens when a deployment craps out, and it’s the least useful error code ever anyway.

The situation was that, on yet another Latitude E7470 with UEFI boot, my Win 10 1703 EDU task sequences are failing at the very early “Apply Operating System” step.  Consistently.  SMSTS.log tells me stuff about the system drive and partitions, so I’m wondering then if it can’t find the drive for some reason.

I do a search on “Unable to find the partition that contains the OS boot loaders. Please ensure the hard disks have been properly partitioned”

CMTrace also identified this information:

Unspecified error (Error: 80004005; Source: Windows) ApplyOperatingSystem 6/16/2017 8:54:50 AM 2004 (0x07D4)

I happened upon Henk’s blog post.  Flippin’ Secure Boot.

I went into BIOS after a reboot, turned off Secure Boot…..and now I’m watching a beautiful vision of task sequence that’s actually applying.


UEFI? Book it!

This past week, my Win10 task sequences were failing on the Latitude E7470s.  Yet they were fine on my testbed Intel NUCs.  The same task sequences, so it wasn’t the software.  What the hell was going on here?

Then I started piecing it together.  Intel NUCs vs. Lat 7470s.  The task sequence on the Lats go really quickly to Applying Operating System where it failed.  SMSTS.log said:

There are no more volumes available for use.

The requested target could not be resolved to a valid volume on this computer. Check your task sequence to ensure this drive is correct and that it is being createdThe requested target could not be resolved to a valid volume on this computer. Check your task sequence to ensure this drive is correct and that it is being createdThe parameter is incorrect. (Error: 80070057; Source: Windows) ApplyOperatingSystem 6/15/2017 9:03:44 AM 1596 (0x063C)

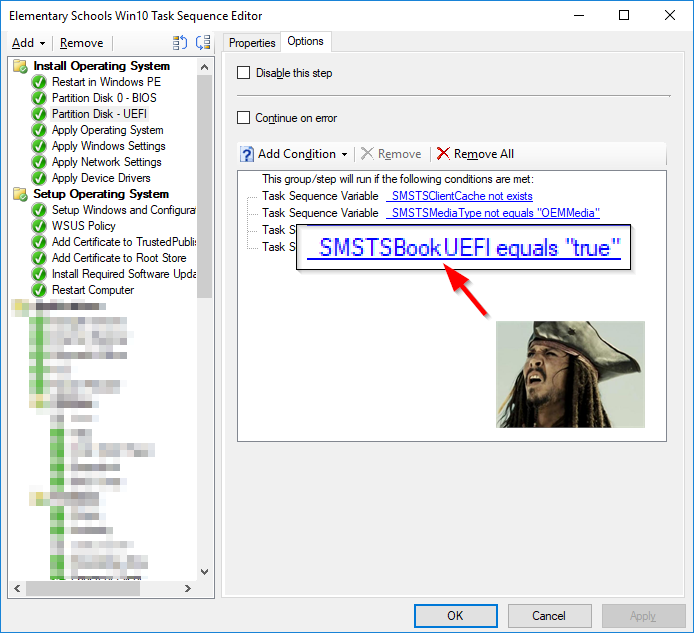
I then noticed that the step where the TS should be formatting my drive to UEFI was not actually starting.  Why?  It had to be that step, because the NUCs, which are on legacy boot, partition normally as BIOS.  I looked at my task sequence variables, because everything else looked fine.  Then, I saw it:

The variable “_SMSTSBootUEFI” had somehow changed to “_SMSTSBookUEFI.”

And since I copy/paste tasks from sequence to sequence, I had inadvertently copied this error to all of my Win 10 task sequences.  After correcting that, my Lat 7470s partitioned, formatted, and applied the OS correctly.

But how in the hell did that get changed in the first place?

Deploying Sketchup 2017 with SCCM & Windows 10 1703 EDU

For the past few months, I’ve been struggling to deploy Sketchup 2017 with SCCM.  2015 seemed to deploy much more smoothly, despite having to implement a few kludgy workarounds.  But no matter what I tried, 2017 would fail during a task sequence with the dreaded 0x80004005.

Sketchup’s support site mentioned that 2017 requires .NET Framework 4.5.2, and seemed to imply that 4.5.2 was the only version that it supported.  That sounded strange to me, especially since attempting to install 4.5.2 on an updated and patched Win10 introduced even more work than I wanted to put in.  And once I ran updates, I had .NET 4.7 anyway.

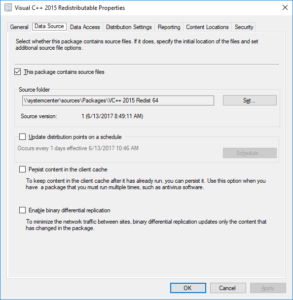
But they also mentioned needing to install the Visual C++ 2015 Redistributable.  My vanilla Win10 install has 2013 installed.  OK, so let me give that a try!

I manually installed VC++ 2015, then installed Sketchup.  Success!

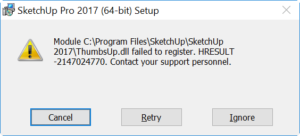
I wiped the machine and tried to install Sketchup by itself.  FAILURE!  I forget the exact error message, but it would fail:

For our friendly neighborhood search engine crawlers, the text of the error is:

Module C:\Program Files\SketchUp\SketchUp 2017\ThumbsUp.dll failed to register. HRESULT -214024770. Contact your support personnel.


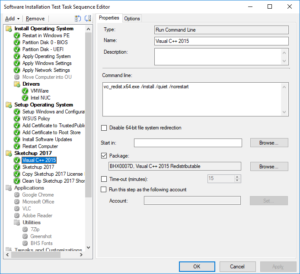
I grabbed the stand-alone installer for VC++ 2015, packaged that up, then applied it to my task sequence.  I also created some basic .CMD files to copy the volume license file and to clean the desktop of the shortcuts that Sketchup created.

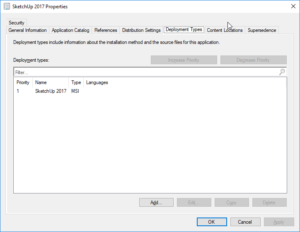
In my source folder, I have four files: the Sketchup MSI installer itself, my activation_info.txtcleanuplinks.cmd, and actinfo.com.

cleanuplinks.cmd:

@echo off
del "C:\users\public\Desktop\Layout 2017.lnk"
del "C:\users\public\Desktop\SketchUp 2017.lnk"
del "C:\users\public\Desktop\Style Builder 2017.lnk"

:SUCCESS
exit /b 0

actinfo.cmd:

@echo off
copy "\\systemcenter\sources\Apps\SketchUp Pro 2017\Files\activation_info.txt" "c:\programdata\sketchup\sketchup 2017"

Naturally, both could be combined into a single batch file, but I kept them separate so that I could activate & deactivate either in my task sequence while I’m still testing.

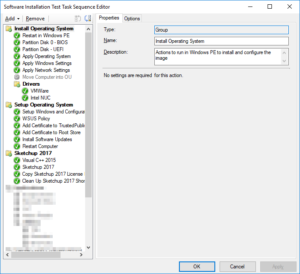
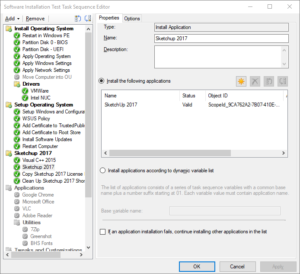
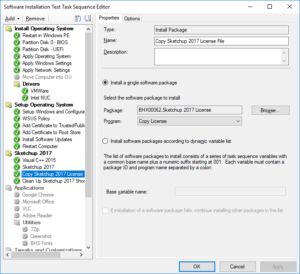
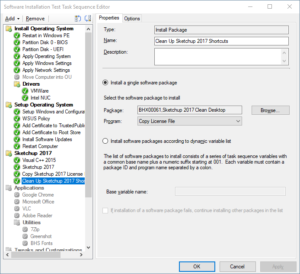
Finally, how the task sequence is built:


Customizing Windows 10 for Schools

Using Windows 10 1703 Education, I applied a number of customizations, drawn from several expert sources and cobbled together into my own Frankenstein’s-Monster of a deployment, with SCCM 1702.

Strategy and Design

Like with all good projects, we need to figure out what the hell we’re trying to do in the first place before leaping into actually doing it.  So we’re going to move all of our deployed computers throughout the district to Windows 10.

Great.

How?

It’s not as simple as “build an image, slap in some software that’s common to everyone, wait for the summer, and hit the uncooled classrooms in the middle of July.”  The default installation of W10 is, at first glance, geared more toward a home-user/personal-experience motif than a professional environment where we take things seriously.

We need to get rid of the superfluous stuff in the Start menu, provide only what’s necessary in the task bar, shut down all the privacy holes, but at the same time still allow staff and students to be able to customize the computing experience (within reason).  We’re not so draconian as to prohibit changing wallpapers and color themes, but we’d also like to provide at least a more organization-centric set of options to begin with.

We’d like to see some simplified task sequences in SCCM, so that if we need to make updates district-wide, we’re not stumbling over the entire console, making repetitive changes to every task sequence.  This means more creative use of task sequence variables and making sure our OUs in AD are cleaner (hah!) and appropriate (hee!).

Setting the Stage

In my SC deployment share (\\[SCCMShare]\sources\packages), I created a folder named “Win10Customizations.”  This will house all of the files, scripts, and folders.

The Details

Start Layout

I wanted to use a partial Start layout so that the commonly used apps in our organization are available immediately, all the superfluous nonsense removed, and still allow users customization ability.  I used my reference machine to build out the Start Menu the way I wanted to see it, then exported its XML with Powershell (see Links & Resources below).

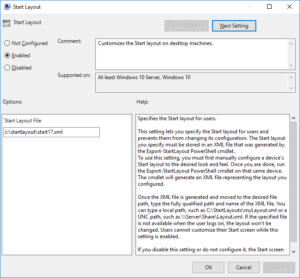
I created a GPO simply titled “Win 10 Start Layout Customization” and made the following changes:

Computer Config > Policies > Administrative Templates > Start Menu and Taskbar set to Enabled and added the path to where my XML would reside on the local drive (in my case, C:\StartLayout\start17.xml)

The second step is to use a Powershell script to create the folder and copy start17.xml to the local drive from our SCCM share.  The script that I used (through lots of trial and error, as I’m quite a PS newbie) is:

$folder = "C:\StartLayout"
$file = "start17.xml"
$fullPath = "$folder\$file"

$source = "\\systemcenter\sources\packages\Win10Customizations\Start Layout\start17.xml"

# Check if folder & file already exist

if (!(Test-Path -path $fullPath)) {
 # File & folder do not exist, so check if the folder by itself exists
 if (!(Test-Path -path $folder)) {
 try {
 New-Item $folder -ItemType Directory
 }
 Catch {
 Write-Warning "Error in creating folder: $error"
 break
 }
 }

}


# Folder has been created or already existed, so copy the file to it

try {
 Copy-Item -path $source -destination $folder
}
Catch {
 write-warning "File already exists."
 break
}

As I’m looking at this code, I realize that I made a few inefficient moves already, but again, I’m still learning!  If you have a cleaner or more robust way of accomplishing the same thing, I’m all ears!  But I think you get the point of what I’m trying to do here.

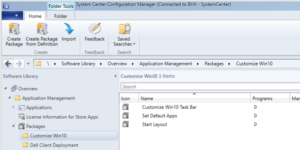
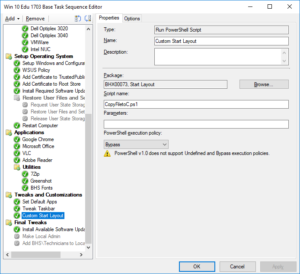
I placed both the Powershell script and the Start layout XML in the same folder.  Then, I created a no-program package in SCCM for the Start Layout.  This is then added to my task sequence, calling a Powershell script referencing the above:

Next, I wanted to get rid of some of the apps in the Start Menu that we’re not going to need in-district.  To do this, I followed Jörgen Nilsson’s instructions for grabbing a list of apps and then manipulating the script to remove them.

Links & Resources

https://blogs.technet.microsoft.com/deploymentguys/2016/03/07/windows-10-start-layout-customization/#Partial

https://4sysops.com/archives/pin-apps-to-the-taskbar-in-windows-10-1607-with-group-policy/

Behavior Management vs. Technology Management

A question came up on one of my mailing lists about what some school districts do to manage students’ personal devices connecting to district networks.  The inquirer’s administration wanted to shut down all guest wifi access as a way to curb social media bullying and other antics, with the assumption that giving students the alternative of having to use their plan minutes would be sufficient as a deterrent.

This seems like an overreaction instead, as well as relying on external forces to manage internal forces.  This is a behavior management issue, as the technology is a tool being misused.  While reducing or eliminating access to those tools would address the issue, how does that impact the rest of the population?

If a handful of students are misbehaving and misusing the technology made available to all students, and that technology is taken away from all students, what are the consequences?  If guest-access wifi is removed, not only does that impact the entire student body, but also any guest speaker, parents, business contacts, and even visitors from neighboring schools.

Drunk driving could easily be resolved by banning all vehicles and alcohol.  Is that the right solution, though?

If there are flies buzzing around from something that’s spoiled in the kitchen, do we remove the entire kitchen?  Or do we hunt around for the rotten meat that fell behind the stove, which is where the flies have congregated?  Yes, it more work to trace the source and to clean up the meat, but it doesn’t go overboard by demolishing the whole kitchen.

SCCM Query for Windows 10 Versions Less than 1607

We started deploying Windows 10 on a wider scale to our users in the summer of 2016.  However, our SCCM installation was broken at the time, so we weren’t able to provide too much in the ways of updates.  We created a from-scratch task sequence of Windows 10 using 1511 as our base, figuring that once that was done ahead of the 2016-17 school year, we could then concentrate on repairing, restoring, or reinstalling SCCM.

Several months later, we reinstalled SCCM and updated to 1702.  Now we can get back to work.

I wanted to know which of the machines out there that have Win10 are still on versions older than 1607 so we’d know what we’re dealing with for the forthcoming upgrade project.  To do this, I created a query in the Config Mgr console:

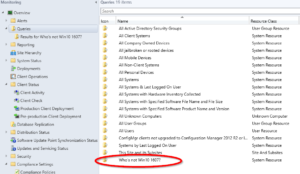
The query pane

Start by clicking Create Query either in the ribbon or right-clicking on “Queries” in the navigation pane or in the results pane.  This launches the Create Query Wizard.

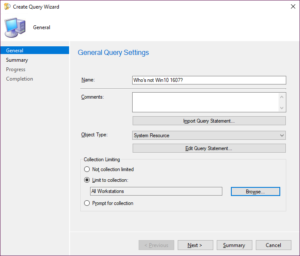
Enter a name.  I used “Who’s not Win10 1607?”  I also limited the search to “All Workstations.”  Click “Edit Query Statement…”

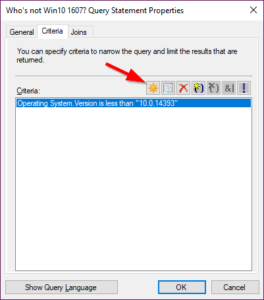
Under the “Criteria” tab, I created a new criterion (click the star button).

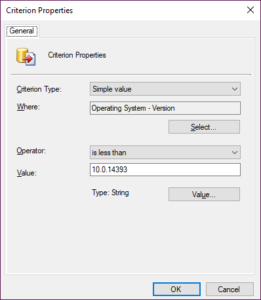
In Criterion Type, leave the type as “Simple Value” and click “Select…”  Choose “Operating System – Version.”  For the Operator, choose “is less than” and type “10.0.14393” in “Value.”

Note: if you want to include 1607, change the operator to “less than or equal to” instead.

Also note: the value field is a string value, so we’re lucky in that “10.0.xxxxx” occurs earlier as a string than Windows 7 and Windows 8 versions (which start with 6).  If I wanted only Windows 7 or Windows 8 machines, I’d have to get a little fancier with my criteria if I didn’t want to include Windows 10 in the results.

Click OK.

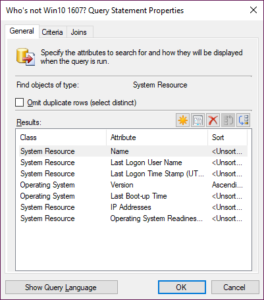
For my query, I only wanted certain fields (columns), not all of them.  So I chose Name, Last Logon User Name, Last Logon Time Stamp, Version, Last Boot-up Time, IP Addresses, and Operating System Readiness Branch.  You can choose other fields by clicking the “Select” button and going through the desired attributes.

To use this set, you can also use my query in a query language window if you don’t want to go through the click/select process.  Click the “Show Query Language” button and copy/paste this:

select SMS_R_System.Name, SMS_R_System.LastLogonUserName, SMS_R_System.LastLogonTimestamp, SMS_G_System_OPERATING_SYSTEM.Version, SMS_G_System_OPERATING_SYSTEM.LastBootUpTime, SMS_R_System.IPAddresses, SMS_R_System.OSBranch from  SMS_R_System inner join SMS_G_System_OPERATING_SYSTEM on SMS_G_System_OPERATING_SYSTEM.ResourceID = SMS_R_System.ResourceId where SMS_G_System_OPERATING_SYSTEM.Version < "10.0.14393" order by SMS_G_System_OPERATING_SYSTEM.Version

Note: Change the < to <= if you want to include 1607.

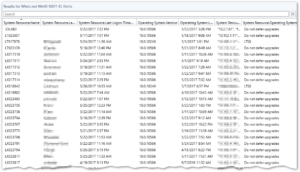
Once you’re done, run the query.  I have 45 devices on versions of Win 10 earlier than 1607:

I can see now that most of my users are on Current Branch.  I have three on 1507 (support for which just ended), and given who the users are, they need updates (updating won’t break what they do).  Everyone else is on 1511.

When I change my query to <= 10.0.14393 instead, I get over 150 results, so that means most of my deployments are on 1607 (yay!).

Finally, a side benefit I discovered in this query is that I could find a few incorrectly named computers that have Windows 10 deployed.  Our naming convention includes the form factor of a device as well as its OS version so that we can see what we’re dealing with at a quick glance without having to look it up.  Within the first five entries, I see three computers that need to be renamed (which is a help desk ticket for the technicians responsible for those areas).