Over the course of the last few days, I’d searched for images and dragged ones I wanted on to the desktop. This morning, I saw a shortcut on the desktop, what looked like a broken link with the name “data image_jpeg;base64 [whole buncha’ hex values]“
The problems with this file were:
Can’t delete it
Can’t drag it to Recycle Bin
Can’t edit its file name
Attempting to delete with CMD or PowerShell results in “file not found” (IT’S RIGHT THERE!!!!!)
All permissions are as expected. I’m the admin on my machine. It didn’t come from a badly written GPO.
The Fix
Open WinRAR, of all things. Navigate to the file’s location (in my case, the desktop). Delete the file from within WinRAR’s explorer with Shift+DEL.
This past week was the return to in-person conferences for PSUG (which does not officially stand for “PowerSchool User Group”…but it kinda’ is). I had the privilege of teaching 5 different topics across 6 sessions. I read through the session feedback surveys and when focusing on some of the more critical comments, I found that I agreed with them.
Some of my sessions were too short and I could’ve included more material. I recognized that I had planned for a hour’s worth of content but then discovered that the session length was 90 minutes instead. OK, got it. I’ll plan better for next time.
I’m also flattered and humbled by all of the positive comments. Some remarked that they’d want me to teach for an entire week and not just for a couple of 90-minute sessions here and there. I did prep my learners that what I was going to show them was only the tip of the iceberg, so I suppose that checks out.
The one thing I was worried about and made sure to focus on was my habit of talking too fast. I got some advice from a more experienced presenter that “nobody complains if you go too slow, but everyone complains if you go too fast.” I took that to heart because I know in past presentations, I have talked too fast and burned through slides due to both nervousness and realizing that I’m not engaging with the audience as I expected and hoped to.
I feel like the success of my sessions was because I inject a lot of comedic touches in my speech. I had to remind myself that despite the size of the audience, I am speaking to peers; people who are in my line of work, who do the same things I do, and who suffer through the same setbacks and indignities as I have.
So what can I do to reassure them that I get it? I know their pain. I know their difficulties. How do I connect with them on the same level?
In my minor in college (training & development), one of the first things we need to do when designing instruction for adults is performing a needs assessment. What does my audience need from me and my content? If my content doesn’t address their needs, then it’s failed.
Answer their question: “what’s in it for me?”
Justify why they’re there.
If I can make them laugh, if I can get them to relax, to see me as a partner rather than a lecturer, then they’re more apt to be engaged and open to learning.
I did feel that my weakest sessions were the ones where I was sitting down at the computer to demonstrate steps and processes even if I wanted them to walk through it with me. The ones where I was standing most of the time and moving around to prompt participation were the more successful ones. But those step-by-step ones, I still have to sit or remain static in one place in order to demonstrate the material. So not sure how to make that more stimulating and engaging.
Well, either way, this is an ongoing learning experience for me. My first time presenting before peers was a total disaster because I panicked and did everything wrong. My second time was better. I had more experience after that, and I think this time around has been the most success I’ve had yet.
Instead of crawling under a desk with all the nasty dirt and other things that office workers do to their floors, or trying to decipher the faded label from the underside of a laptop, use this command to reveal the serial number:
wmic bios get serialnumber
This would’ve been so much more helpful when I was still a field technician.
Well, sometimes, I need a hammer that can drive nails, remove them, drive screws, and open a bottle of beer (without opening up my flesh at the same time). In the case, I’m building a Power BI report but need to incorporate a data table.
Sounds basic, except that included in the data are text-based values, not numbers. And I’m not using aggregation or calculation, so the default methods of conditional formatting in a Power BI table don’t work for me. The right tool here would be Excel where I can apply conditional formatting pretty much however the heck I want.
I don’t want to use Excel.
Here’s what I want to see:
And here’s how I did it.
In the PowerQuery editor, I added conditional columns that defined the HTML hex code color I want to use, depending on the text value:
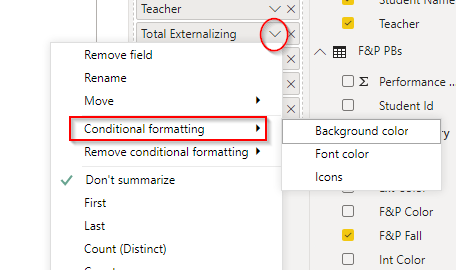
Then, back in my report, I choose the field that’s included as a value in my table, open the dropdown menu, choose Conditional Formatting and Background color:
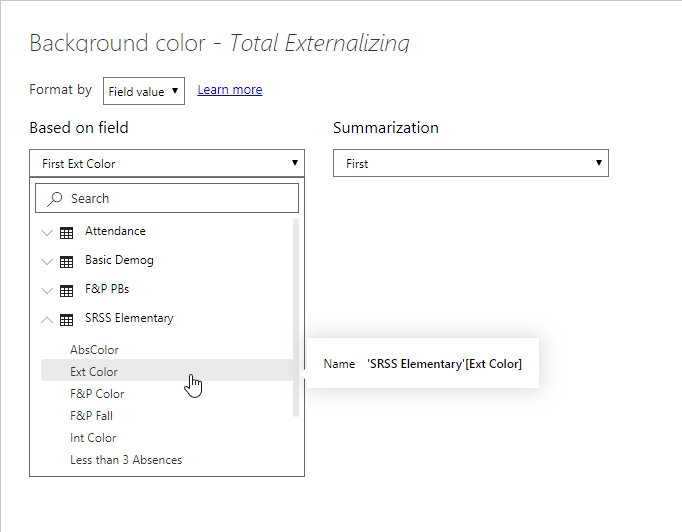
I’m formatting based on the field value, and choosing the column that contains the color value (in this case, “Ext Color”). I don’t care about the choice in “Summarization.”
And that applies the color choice to the column based on the value within the cell.
I decided to spin off my guitar building projects to a new site, Taiho Guitars. While this year has been far from typical, I have noticed that guitar building has dominated the posts of late here at MHT, leaving behind the original theme of “technology.”
I was chatting with my coworker one morning. We tend to have conversations that just randomly veer off into multiple directions as a start to our day, which is nice. I showed her photos of Cabernet as we’d just gotten back from our house up north.
Her eyes got wide and she asked if I could build something as an anniversary gift for her husband. My first commission!
It was a challenge because it’s a left-handed bass. I did some searching and found a kit and gave her an estimate. I quoted low because I’m still in the beginner stage of luthier-dom. She said to go for it. I asked her to think about a design scheme or theme for it, and a day or two later, she had an idea.
Her husband is a big fan of FC Bayern. His family is from Bavaria, although he was born and raised in the US. So I had to do some research to see what they looked like and how to apply that theme to the bass.
.
There were lots of challenges with this bass kit. Glue spots in the body prevented even dye absorption, parts were missing, or parts were damaged, so I ended up buying replacement parts throughout the building of this instrument. I learned about lacquer blush because one morning, I took the body out to the shed at our country house to get started on the day’s round of top-coating early.
Too early, as it turned out. Too much humidity in the morning air led to moisture being trapped under the layer of lacquer I laid down. This resulted in a distinct white haze and a lot of cursing from me. Luckily, I discovered that if I spray a light mist of lacquer over those spots to remelt the lacquer, the moisture can escape, which it did.
By the time I’d gotten to tuning and intonating, an electronics problem arose. The tone potentiometer was somehow damaged and fell apart as I was tuning. The shaft spun in 360° — that’s not good. Then a piece of the PCB broke off. So I had to order a replacement pot, which delayed final set-up even more.
But it was eventually done.
I included the team’s motto — Mia san mia — in the headstock. I used my Cricut vinyl cutter to cut the motto from white vinyl, applied it to the headstock then spent several days covering it with lacquer to reduce the millimeters of noticeable height difference as well as to protect the vinyl.
Similarly, I added a tribute to the Bavarian flag on the pickguard:
The hue is closer to the actual Bavarian flag than the variation used in the FC Bayern logo. I was having trouble finding a more royal blue vinyl rather than the navy blue I kept finding, so I went with the lighter sky-blue hue to match the flag instead. I found a matched color of Testors enamel marker, so I lined the edge of the pickguard with the enamel for an additional detail.
Testing it out turned out to be rather difficult as I’m a right-handed player. I tried playing the bass intro the Metallica’s My Friend of Misery but the longer horn that’s supposed to be at the top get getting in the way. Playing it upside down also meant my muscle memory had to adjust to the new placement of the strings. I gave up and went with something simpler instead.
I played through the pentatonic scale in A a few times then hit Stand By Me instead:
It only looks like I’m playing left-handed as I took the video in selfie mode, which mirror-imaged the whole thing, as evidenced by my Testament t-shirt.
This will be delivered to the office this week so my coworker will see it first thing in the morning.
I was getting frustrated applying wipe-on poly to Kijo, only to consistently see wipe marks drying into the finish and no amount of sanding could smooth it out completely. The more aggressive I got, the more I burned through the underlying black.
I know I’m still doing it incorrectly, so it’s definitely a matter of not having executed proper technique. But I also know my frustration levels in that I need to feel like I’ve accomplished something in order to not give up in exasperation.
I went back to the tried and true method instead of spray lacquer. That was another $20 I wasn’t anticipating, but it got me mentally and emotionally back on track, at least.
Since I wanted the Strat boat-style jack, I had to expand the jack hole (hah!) that I asked Warmoth to do. The plan sounded great in my head, but when it came time to do it, I naturally wondered if I was about to make a $240 mistake.
I taped the area and marked out the outline that I’d need to cut and sand to make the plate fit. I drilled a starter hole at the “south” end of the jack plate, then used my jigsaw with the scroll saw blade to cut out extra material. Then it was time to get to work with the barrel sander to do the fine-tuning and shaping of the expansion.
My shipment from Warmoth arrived today. Two weeks from order to arrival. Super-fast considering they had to rout the pick-up cavities and the control holes to my specs. I expected it to take a month then another week for transit, but they got it done in one week then shipped it.
Mahogany body, routed for dual humbuckers, fixed Tune-o-matic bridge with string-through-body, and single volume+tone potentiometers, and 3-position Gibson-style toggle switch.
Thanks to friends’ opinions, I’ve decided on gold accent for the new guitar. I also came up with its name: Kijo, the Japanese term for “female demon.”
The one thing I wasn’t happy with in this design is the headstock. While it fits the angles and pointy-ness of the body, it’s too reminiscent of a stock Jackson headstock, even though the body is essentially the Jackson King-V. The company I’m ordering the body & neck from don’t have anything stock that would otherwise fit the aesthetic of the guitar.
As I was working on another woodworking project, though, I started thinking about maybe cutting my own headstock. Of course, that would necessitate some practice ahead of time before I leap in and possibly ruin a $350 custom neck.
eBay to the rescue!
I can buy a spare neck to practice woodworking on for under $40. Highly preferable to working out mental ideas and refine my woodworking technique on a throwaway than the real project, since real life doesn’t have a “revert to snapshot” or “spawn from last save” feature….
Which leads to:
There’s enough material in the paddle headstock of the neck (this blank style is offered by the company making my guitar body, which I just ordered this week) to cut it into the shape illustrated above.